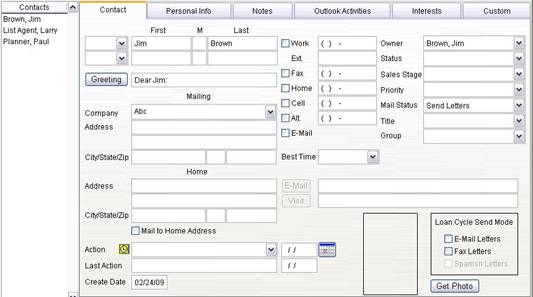
Contact Main Screen
Personal Title
Click the list preceding the first name field and highlight the desired title, if any.
Names
First names are spell-checked automatically, and are compared with personal titles to make sure they match. For example, if you select Mr. and the first name is Nancy, a message appears indicating that the title is male and the first name is female.
Greeting
The Greeting field is used as the salutation in letters to Contacts. Greetings can be formal or informal. For example, Dear Mr. Smith is a formal greeting; Dear Robert is an informal greeting. The type of salutation is determined by the style you select. Select Tools/Options and the General tab to set this option. The greeting field is created automatically when you save the record or when you click the Greeting button. You may also type in a different greeting if you prefer.
The Greeting field is used as the salutation in letters to Contacts. Greetings can be formal or informal. For example, Dear Mr. Smith is a formal greeting; Dear Robert is an informal greeting. The type of salutation is determined by the style you select. Select Tools/Options and the General tab to set this option. The greeting field is created automatically when you save the record or when you click the Greeting button. You may also type in a different greeting if you prefer.
Company Name
As you enter the company name, Mortgage Quest searches for existing companies and will add the address information as you type. To select the company displayed, press Tab or Enter. When there are no matching companies, the address fields will be blanked. Continue typing the company name and press Tab or Enter when completed. The company information will be added to the list when you enter and save the address information.
To turn off this feature, select Tools / Options and click General. Unmark the Search Company Name box.
Addresses
All letters are sent to the mailing address. If you want to send letters to the home address, enter the information and mark the box named Mail to Home Address.
When you enter a zip code and the Automatic Zip code feature is enabled, the city and state information is automatically entered. If the zip code is not in the database, you can add the zip code to the list.
You can also enter zip codes into the zip code database through the Modify Lists. Select Tools / Modify Lists.
Phone Numbers
Enter the phone numbers.
Best Time
Select the best time of day to contact this person.
Best Way to Communicate
The checkboxes next to the phone numbers indicate the best way to contact this person. For example, mark the Home checkbox if this person prefers to be contacted at home.
Click E-Mail to create a temporary e-mail message.
Owner
This is the registered owner of Mortgage Quest. This list will contain multiple names for the Enterprise system.
Status
Select the appropriate descriptor from the Status List:
· Client: The Contact has a business relationship with you or is in a related parties group.
· Prospect: The Contact is a potential client.
To create additional Status types, select a blank status from the list. Then type the new status value and press Enter.
Sales Stage
Select the sales stage the contact is in the sales cycle.
Priority
Select the priority for this contact. Priority can be set to High, Medium or Low.
Mail Status
The Mail Status field allows you to choose whether or not a person will receive letters. If you want a person to receive letters, select Send Letters. If you do not want a person to receive any letters, select Dont Send Letters.
Title
Select the appropriate title from the list, such as President, Manager, etc. To add additional titles, select a blank title, enter the text and press Enter.
Group
Select the appropriate group from the list to categorize this contact. Groups are used for adding people to campaigns, viewing and creating reports. To add additional groups, select a blank group, enter the text and press Enter.
E-mail Address
Enter the E-mail address for the contact. Click Send to create a temporary e-mail message.
Website Address
Enter the website address for this contact. Clicking Visit starts Microsoft Explorer and visits the web page.
Get Photo
If you have the photo of the contact, click Get Photo and select the photo file.
E-mail Letters Checkbox
The E-mail Letters option enables Mortgage Quest to automatically e-mail Loan Cycle letters to contacts. Mortgage Quest determines if this person is eligible to receive e-mail letters based on the Loan Cycle options. Select Tools / Options and click Loan Cycle to change set these values.
A fax number must be entered before the Fax Letters checkbox can be set.
Fax Letters Checkbox
The Fax Letters option enables Mortgage Quest to automatically fax Loan Cycle letters to contacts. Mortgage Quest determines if this person is eligible to receive faxes based on the Loan Cycle options. Select Tools / Options and click Loan Cycle to change set these values.
Spanish Letters Checkbox
The Spanish Letters option enables Mortgage Quest to automatically send Loan Cycle letters written in Spanish. Spanish letters are sold separately. The checkbox will be dimmed if they are not installed.
Action
Select an action from the list. To create a new Action, select a blank item from the list, enter the information and press Enter.
Action Date
Enter the date that you want this action to occur or click the icon to display a calendar.
Mortgage Quest's Event Monitor will notify you when this date occurs.
Last Action
When you select a new action, the previous action is saved in this field. If there is a value in this field and a new action is selected, the last action value is stored in the notes.
Create Date
Mortgage Quest automatically enters the date the Contact record was created. This date is important because it is used to select records by various reports.