Creating New Marketing Campaigns
To create a new campaign, click  to display the Campaign Manager and then
click New.
to display the Campaign Manager and then
click New.
Step 1: Enter Campaign Name and Description
1. Enter the campaign name and description.
2. Click Next.
Step 2: Select Type of Campaign
1. The campaign type indicates who will be receiving letters, such as borrower, contacts or both borrowers and contacts. This selection is important because it determines the letters available for the letter list and the people who can be added to the Target List.
2. For example if you select a borrower campaign, you can only use borrower type letters and you can only add borrowers to the Target List.
3. Click Next.
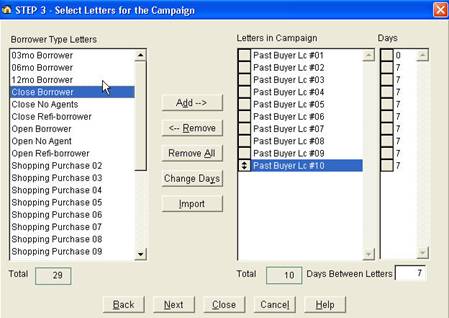
Step 3: Select Letters for the Campaign
The Letter List is the list of marketing letters that will be mailed to people in the campaign. You can create a new list or import a list of letters from another campaign. The campaign type determines the letters available for the Letter list. For example, if the campaign type is for contacts, only contact letters are listed.
Note: You must first create marketing letters using the Letter Manager before you can use them in campaign Letter List. Also, the type of letter is very important when creating the letter. For example, if you create a letter that is a contact-type letter, the letter will not be available when creating a borrower-type campaign.
To create a new Letter List:
1. Select the letters from the left list and click Add or double click to move them to the Letters in Campaign list.
2. Set the Days Between Letters value at the bottom right side of the screen. This value specifies how often to send letters. The default value is 7 days.
3. The order of the letters in the right list determines when the letters will be printed. The first letter to print is the top letter.
4. To change the order after letters have been moved, click the small box to the left of the letter name, hold the left mouse button down and drag the letter up or down.
5. To change the days between letters in the list, click the letter and then Change Days.
6. Click Next when finished.
To import letters from another campaign:
1. Click Import.
2. Select a campaign. The letters used in the selected campaign will be imported into the letter list.
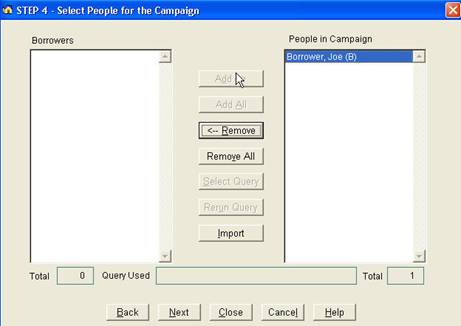
Step 4: Select People for the Campaign
The Target List is the group of people who will receive letters during the marketing campaign. You can import an existing Target List from another campaign or create a new one. The type of campaign determines the people displayed in the list. For example, if the campaign type is for borrowers, only borrowers will be displayed in the list.
(B) appears after a borrowers name to help distinguish borrowers from contacts.
Note: You can create a campaign without selecting people for the Target List in the campaign manager. After a campaign is created, there are several ways to add people to campaigns from the Borrowers or Contacts databases. See the section on Adding People to Campaigns.
To create a new Target List:
1. You can select people for the campaign in one of two ways:
· Find each person in the list and double-click or click Add to move the person to the right list.
· Click Select Query. You can select a query to find specific people for the marketing campaign. For example, you can find contacts that have the group value of Realtors. See Creating Queries.
2. Click Next when finished.
Note: Only people with Mail Status set to Send Letters can be added to Target Lists.
To import a Target list from another campaign:
1. Click Import.
2. Select a campaign. The people in the campaign will be imported into the Target List.
Step 5: Define Campaign Events (Optional)
A campaign event determines when to add and remove people to and from the marketing campaign. For example, add a borrower to a campaign when the Status is set to Prospect and remove when the Status is Client.
A campaign event consists of the action to take (i.e., Add or Remove), the database field to monitor (e.g., Borrower Status field) and the trigger value (e.g., equals to Prospect). Mortgage Quest monitors the events you define and takes the specified action when information in the database field matches the trigger values.
There are many advantages to using campaign events:
· You can define events to remove a person from one campaign and add the person to a different campaign.
· Mortgage Quest always notifies you before adding or removing a person from a campaign.
· You can define one-letter special purpose campaigns and add people automatically.
The following fields are available for creating campaign events for Borrower campaigns:
· Borrower Status
· Loan Purpose
· Loan Status
· Priority
· Property Type
· Sales Status
The following fields are available for creating campaign events for Contact campaigns:
· Contact Status
· Contact Group
· Priority
· Sales Status
· Title
Note: You can't create campaign events for Contacts & Borrower-type campaigns

To create a campaign event:
1. Select an action from the Action list (i.e., Add or Remove)
2. Select a field from the Trigger Fields list.
3. Select a value from the Trigger Value list.
4. Click Add Event to add the event to the list.
You can create several events for a campaign by using the OR and AND connectors. For example, you can create an event to add a person to a campaign when Contact Group equals "Realtor" OR when Contact Group equals "Selling Agent" OR Contact Group equals "Listing Agent". In this case, when the Contact Group field matches any of the target values, the person will be added to the campaign.
You also can define events using different fields. For example, you can add a person to a shopping campaign when the Loan Purpose field equals "Refinance" AND the Borrower status field equals "Shopping". In this case, both have to match the target values before the person is added.
Event Suggestions
Campaign events are very flexible and can be used for many different purposes. The following are suggestions for creating events.
· Avoid very complex events. It may be difficult to determine exactly when they add or remove people because of the number of fields and connectors involved.
· If you have a complex situation that you want to add or remove someone from a campaign, it's better to define a specific value for one of the fields. Use the Modify List feature under Tools to add values to any list. Then you can specify these values in events to trigger certain actions.
· In some situations, it may be better to use the Add to Campaign or Remove from Campaign commands under the File menu to add or remove people manually.
· You can create a series of events that transfers a person from one campaign to another when database information changes. Consider this scenario:
· You have two campaigns called Prequalify and First Time Buyer. Define events for the Prequalify campaign to add when the Borrower Status field equals "Prequalify " and remove when the Borrower Status equals "Client."
· Define events for the First Time Buyer campaign to add when the Borrower Status equals "Client"
· When you enter a borrower and set the Borrower status to "Prequalify" and save, the borrower will be added to the Prequalify Campaign. When you change the Borrower Status to "Client", two events occur. The borrower will be removed from the Prequalify campaign and added to the First Time Buyer campaign automatically.
Step 6: Select Campaign Start Date
1. Enter the date to start the marketing campaign or click the Calendar button to select a date.
2. Enter the number of days before the first letter. When you add a new person to a campaign, this value is used to schedule the first letter of the campaign. For example, if you enter a 30 and add a person to this campaign today, their first letter is scheduled to print in 30 days.
3. The default value is 0, which means the first letter is due to print the day you add a person to a campaign.
4. Click Next.
Step 7: View New Campaign Status
If the Campaign status is Ready and you have added people to the Target List, there are letters due to print for this campaign. If you left the Target List empty, the letters will become due to print when you add people to the campaign later.
If the Campaign status is Incomplete, the Letter List is empty. Go back to Step 3 and select letters for the campaign.