Importing E-Mail Leads
If you receive leads via e-mail, Mortgage Quest can be customized to import them from Outlooks Inbox. This feature requires the Mortgage Quest Outlook Interface module. Also, since e-mail leads come in many different formats, a set up fee is required to customize Mortgage Quest to import the data from your specific e-mail form. Please contact Market Focus, Inc. if you are interested in importing e-mailed leads.
To import e-mail leads:
1. Click the Import  icon.
icon.
2. Select the name of the template (created by Market Focus) from the Read Data From list.
3. Click Read Borrowers or Read Contacts as appropriate for the type of e-mail lead.
4. Mortgage Quest reads all e-mail in the Outlook Inbox and looks for the specific e-mail subject that identifies e-mail leads. It then displays the following screen:
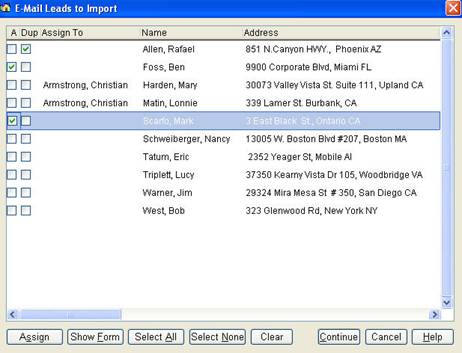
The E-Mail Leads to Import screen has the following features:
· A Column mark the checkboxes in the A column that you want to assign to user.
· Dup Column Indicates that this is a duplicate lead. A duplicate lead may already be in Mortgage Quest or there may be two e-mail leads with the same name and address.
· Assign To Column The name of the person to whom the lead is assigned. If this column is empty, the lead will not be imported.
· Assign Select a person to assign the lead. If you are using a multi-user version of Mortgage Quest, you can divide leads among multiple loan officers. The Assign Lead screen displays. See below.
· Show Form Show the e-mail form.
· Select All Select all leads in the list.
· Select None Unselect all leads in the list.
· Clear Clear the Assign To field for all selected leads in the list.
· Continue Close and import all assigned leads.
In order to import e-mail leads into Mortgage Quest, you need to assign them to a registered user (e.g., Christian Armstrong). Unassigned leads will not be imported. After leads are imported into Mortgage Quest, all e-mail leads are deleted from Outlooks Inbox.
To assign leads:
1. Mark the checkboxes next to the lead in the A column. You can use Select All to mark all the checkboxes at one time.
2. Click Assign and the Assign Leads screen displays, shown below. You can assign all marked leads to one user or you can divide leads equally among multiple users selected.
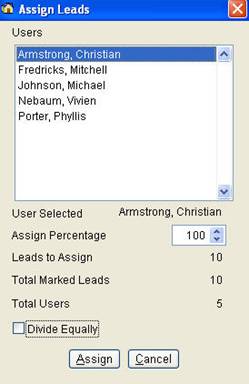
The Assign Leads screen has the following features:
· Users List Shows all registered users, which can be one for a single user or multiple users in a multi-user system.
· User Selected Shows the user currently selected and who will be assigned leads.
· Assign Percentage Indicates the percentage of marked leads to assign to the person in the User Selected field.
· Leads To Assign The number of leads that will be assigned to the User Selected. The Assign Percentage feature changes this value. For example, if you select 50 in the Assign Percentage field, the Leads to Assign value is set to 5.
· Total Marked Leads The number of leads that were marked for assignment.
· Total Users The number of users in the Users List.
· Divide Equally Divide the number of marked leads equally among the users selected in the Users List. To select multiple users in the list, hold the CTRL key down and click users in the list.
· Assign Assign the marked leads to the users selected.