Setup for Importing ACT!
The import setup wizard guides you through the steps required to import data from ACT! databases. In order to import from ACT!, you need to map Mortgage Quest fields to the ACT! fields. This only has to be done once for each database.
The Import Template Manager manages the process for creating and editing templates.
It has the following features:
· New Create a new template.
· Edit Edit an existing template.
· Rename Renames a template.
· Delete Deletes a template.
· Report Prints a report showing how fields are mapped between ACT! and Mortgage Quest.
· Groups Specific ACT! groups will be imported with a template.
To create a new ACT! template:
1. Click the import  icon.
icon.
2. Select ACT from the Read Data From list.
3. Click Setup Wizard.
4. Click New.
5. Mortgage Quest selects the last ACT! database opened to import. If this is incorrect, click Find Data and select the ACT! database to import. The ACT! database is usually located in the My Documents folder and has the file extension DBF. If the database is password protected, enter the user and password used to access the database.
6. Click Next. If the ACT! database contains other loan officers data, click Map IDs to map the Mortgage Quest user to the ACT! owner field. See Map Loan Officer IDs for more information.
7. Select the type of people to import: borrowers or contacts. You cannot import both borrowers and contacts with the same template. If the ACT! database has both borrower and contact records, you can create ACT! groups for borrowers and contacts. Then create a template for borrowers and another one for contacts.
8. Click Next.
9. Mortgage Quest already maps common fields with ACT!, such as names, addresses and phone numbers. The mapping screen allows you to map other ACT! fields to the corresponding Mortgage Quest field.
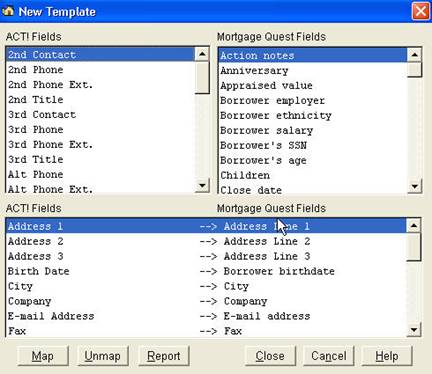
10. Select an ACT! from the left list.
11. Select a Mortgage Quest field from the right list.
12. Click Map to map the two fields together. Continue mapping fields as needed.
13. Click Report to print a list of mapped ACT! and Mortgage Quest fields.
14. Click Close when finished and enter a name for the template.
15. Click Yes if you are importing specific ACT! groups into Mortgage Quest.
16. Select an ACT! group from the left list and click Add to move it to the Import Group List. Mortgage Quest imports ACT! records only if they are members of the groups or subgroups in this list.
17. Click Close when finished.
18. Close the template manager to return to the import screen. If you are importing Borrowers, click Import Options to set options as desired.
19. Once a template is created, select it from the Read Data From list and click Read Borrower or Read Contacts to import data.