Print and E-Mail Monitor
The Print and E-Mail Monitor searches for letters due to print and displays them in a list. When you print, Mortgage Quest selects the correct letter, determines the person receiving the letter, and then sends commands to Microsoft Word to merge and print, fax or e-mail letters. Once Mortgage Quest prints, it schedules the next letter in the campaign.
When you start Mortgage Quest, the Event Monitor searches for letters due to print and displays the Print Monitor in the list of events that are found. Select Print Monitor and click Select. A list of all campaigns with letters due to print displays.
You can also search for letters to print by clicking the Print
Monitor  icon.
icon.
Print Letters and Labels and Send E-mail
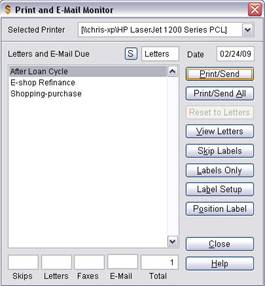
Select a campaign and click Print/Send. Mortgage Quest prints, faxes, or e-mails the letters in the campaign. The print mode (i.e., print, fax, or e-mail) is determined by a number of factors. If printing the Loan Cycle, the print mode is determined by the options described in the section on the Loan Cycle.
After the letters are printed, Mortgage Quest asks if the letters were printed successfully. Click Yes and the campaign is updated and now ready to print labels. Click Print again to print labels for the campaign. Mortgage Quest only prints labels for letters actually printed. No labels will be printed for letters that are faxed or e-mailed.
If the letters dont print successfully, click No when asked if they printed OK. This allows you to reprint the campaign.
The S button at the top of the Print Monitor determines which is printed first: labels or letters. It is recommended that letters be printed first, then labels. If you print labels first, labels are printed for everyone in the campaign, regardless of the print mode. If you print letters first, labels are not printed for letters that are faxed or e-mailed.
Selected Printer
The selected printer shown in the list will be used when you print letters. This is usually your default printer. When you switch to a different printer, Mortgage Quest will use this printer temporarily and then switch back to your default printer. To change your default printer used with Mortgage Quest, select Tools / Options / Printing and select the printer.
Print/Send All
1. Click Print All to print all campaigns shown in the list. The processing is the same as with printing individual campaigns described above.
Note: Mortgage Quest only prints either all labels or all letters selected.
2. Click the Labels/Letters icon to select Letters or Labels.
3. Click Print All.
4. Mortgage Quest will print all the letters or labels for the items shown.
5. After printing, Mortgage Quest asks if the printing was successful. If you answer No, Mortgage Quest asks if any of the campaigns printed correctly. If you click Yes, Mortgage Quest displays the campaigns printed. You may then move the campaigns that completed successfully to the right side of the window. Click Close and Mortgage Quest updates the campaigns completed. The campaigns that did not print correctly may then be reprinted.
Reset to Letters
If the campaign is set to print Labels, Reset to Letters will allow you to print letters again.
Skip Labels
This option allows you to skip printing labels for a campaign.
Labels Only
The Labels Only button is used to process newsletter-type campaigns. This type of campaign is used to remind you to send a newsletter. Click Labels Only to print labels for the campaign and then record that the newsletters were sent to the people involved.
Label and Envelope Setup
The Label Setup feature allows you to select the type of labels or envelopes to print.
Changing Label Types
1. Click Label Setup on the Print Monitor screen. You can also select Tools / Options and the Printing tab to access the label setup.
2. Select the type of label from the list. If you want to print envelopes, select the Laser Bus Envelope 9 ½ by 4 1/8.
3. Click Apply.
4. Click Close.
Printing Envelopes
1. Click Label Setup on the Print Monitor screen or select Tools / Options and the Printing tab. Click Label Setup.
2. Select Laser Bus Envelope and click Apply.
3. Click Close.
Editing Labels and Envelopes
1. Click Label Setup on the Print Monitor screen or select Tools / Options and the Printing tab. Click the Label Setup button.
2. Select the label to edit and click Edit. A report form opens for the label.
3. Click the fields labeled Line 1 through Line 5. Use the arrow keys to move the fields to a new location. You can also use the mouse to drag the fields.
4. Close the form and save changes.
Caution: Never delete a field or you will get errors when printing.
Position Label
This feature allows you to set the column and row of the starting label position.
Date Field
The Print Date field contains the date that will appear on printed letters. Todays date is the default for the Print Date, but you may enter past or future dates. If you change this date, however, it affects when the next letter in the campaign is due to print.
To cancel printing:
Hold the Q key down while printing.