Using the Letter Manager
The Letter Manager is used to manage Mortgage Quest letters.
Click the Letter Manager  icon.
icon.
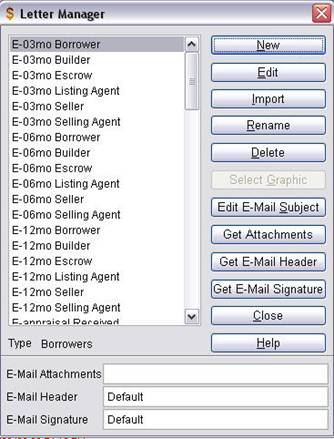
The Letter Manager has the following features:
· New Create a new letter.
· Edit Edit an existing letter.
· Import Create a Mortgage Quest letter from a Word document.
· Rename Rename a letter.
· Delete Deletes a letter.
· Select Graphic Used with the Enterprise system to select a graphic signature and photo to be used when you edit a letter.
· Edit E-mail Subject Edit the subject line for an e-mail letter.
· Get Attachments Used to select files to be attached to the e-mail letter whenever it is sent. This can include any file type, such as a PDF, Excel Spreadsheet or Word Document.
· Get E-Mail Header Selects an HTML file that defines the header of an e-mail. Each e-mail letter can have a unique header file.
· Get E-Mail Signature Selects an HTML file that defines the signature of an e-mail. Each e-mail can have a unique signature file.
· Type Displays the type of letter selected.
· E-Mail Attachments Shows the files that will be sent as a attachments when it is e-mailed.
· E-Mail Header Displays the file containing the e-mail header information applied to this e-mail.
· E-Mail Signature Displays the file containing the e-mail signature information applied to this e-mail..
To create a new letter:
1. Click the Letters  icon.
icon.
2. Select the type of letters to display, such as English, e-mail, Spanish or All versions.
3. Click New.
4. Select the type of letter to create, such as Borrowers, Contacts or Borrowers and Contacts. The type of letter must match the type of person you plan to send the letter to. For example, if you plan to send the letter to borrowers only, Borrower must be selected as the letter type.
5. Enter a unique name for the letter.
6. For an e-mail type letter, enter the e-mail subject.
7. Mortgage Quest opens the new letter with database merge fields for the address portion of the letter.
8. Write the letter and insert any database merge fields desired.
Note: Do not type your name or title at the end of the letter. Mortgage Quest does this automatically.
9. Save your changes and exit Word.
10. Click Close to exit the Letter Manager.
11. Caution: Dont use Save As to save the letter to a different Word document. You cannot use this document in Mortgage Quest. (i.e. the Saved As document)
To edit a letter using the Letters List:
1. If the Letters List is not displayed, select View / Lists and Show Letters List.
2. Go to the Borrowers or Contacts database to show the appropriate letters to edit. For example, when you are in the contacts database, only contact type letters will be shown in the list.
3. Double click on the letter in the list to edit.
4. Mortgage Quest starts Word and opens the letter selected.
5. To edit an additional letter, return to Mortgage Quests Letter Manager. You do not need to exit your word processor.
6. When finished editing letters, exit Word before printing letters.
To edit a letter using the Letters Manager:
1. Click Letters icon.
icon.
2. Select the type of letters to display.
3. Select a letter and click Edit.
4. Mortgage Quest starts Word and opens the letter selected.
5. To edit an additional letter, return to Mortgage Quests Letter Manager. You do not need to exit your word processor.
6. When finished editing letters, exit Word before printing letters.
To import a letter:
You can create a Mortgage Quest letter from another Word document.
1. Click the Import button.
2. Select the type of letter to create.
3. Enter the name of the letter.
4. Locate the Word document you want to import and select it.
5. The document is inserted into the Mortgage Quest letter and Word is started.
6. Edit the letter as needed and save.
7. Exit Word before importing another letter.
To rename a letter:
You may rename any letter except Loan Cycle letters.
1. Click the Letter Manager icon.
2. Select the letter and click Rename.
3. Enter a new name and click OK.
To delete a letter:
You may delete any letter that is not used in active or ready campaigns. You also cannot delete Loan Cycle letters.
1. Click the Letter Manager icon.
2. Select the letter and click Delete.
3. The letter name and the word document are deleted.